Static Ports Install
I am using the static ports supplied with the kit, which are the stick-on variety with barbed fittings. They just need a small hole drilled through the skin, and then they are bonded onto the skin with glue. I will probably use Loctite 422 for the adhesive, since I already some. The kit includes two static ports and a y-fitting. The manual does’t include pictures of how to install the static ports and tubes. I reviewed several other build logs, but most other Sling builders used a different style of static port and tubing, so I had to figure this out for myself. Craig’s build log had a post about updated advice from TAF on where to install the static port, so I followed that information to locate the holes to drill.
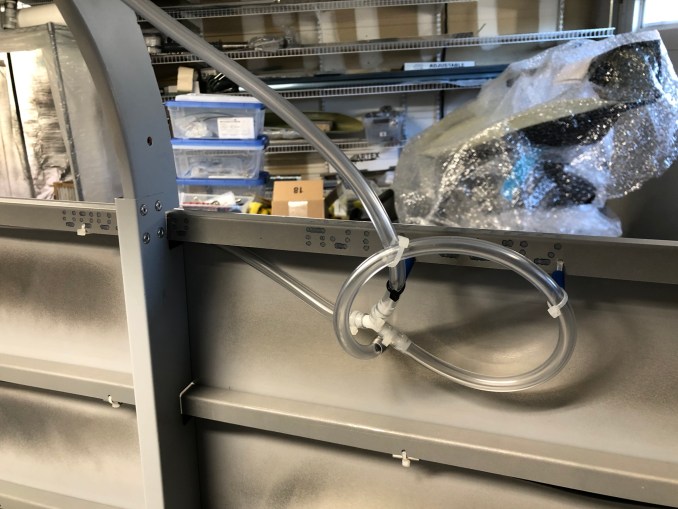
I had to use some creativity with how to route and secure the tubing. I think it came out pretty OK. I made sure to incorporate raised loops to prevent moisture from pooling inside the tubes. I used a combination of stand-offs and carefully-placed zip tie loops to ensure the tubing stays in place.
To install the tubing onto the barbed fittings, I used a heat gun to soften the tubing, and misted a little bit of water onto the fitting help it slide on. I had no trouble getting the fittings on. I put some zip-ties on the ends of the tubing on the y-fitting, to be sure they do not slide off. Zip ties were not necessary for the static port barbs; they were pretty difficult to put on even with heat and water. These lines are not pressurized at all, but the installation is pretty robust — I bet this system could easily withstand 20 PSI without leaking!


I have installed my static ports the same as yours but got thinking about the turbulence caused by the raised surface area. So I contacted TAF and they said that the static port are installed from the inside with the smaller raised area protruding thru the skin.
Thanks for the tip Daniel. I’ve corrected this, see my updated blog entry here: https://sling4.jetshine.net/2020/09/09/correction-of-static-ports-install/
Here is the reply from TAF:
The static ports are fitted inside the skin. When you test fly then you will have to calibrate it with a trip.
What we have found to be the most accurate is the static inside the cockpit and the external static ports are then the emergency alternate.
Kind Regards,
Mike Blyth
Thanks for showing the photo’s of how you ran your static lines – it saved me a lot googling!